Sunday, September 26, 2010

Carol's Apple Crisp

The title for this recipe may have some of you scratching your heads and thinking, "Who's Carol?" Well, the truth is, that I have no idea who Carol is!

The recipe came from a Pfaltzgraff calendar my mother gave me. Each month features a new recipe baked or served on some kind of Pfaltzgraff dish. "Carol's Apple Crisp" is the dish for September. It was quite a hit at Sunday dinner. Enjoy!


Carol's Apple Crisp

6-8 large Granny Smith apples, peeled and sliced
1 cup flour
1 cup sugar
1 teaspoon salt
1 teaspoon baking powder
1 egg
¼ cup butter, softened
cinnamon

Preheat oven to 350 degrees.

Sift flour, sugar, salt, and baking powder into bowl. Add 1 egg. Mix well until crumbly.

Place apples in 9 x 13 baking dish. Sprinkle crumbs over apples. Dot with butter and sprinkle with plenty of cinnamon. Bake at 350 for one hour.

Sunday, September 19, 2010

Apple Coconut Bars

Let's hear it for apple season! This recipe won't use up all your apples, but it is a nice way to usher in the fall season.

Apple Coconut Bars

Ingredients:
½ cup melted butter (1 stick)
½ cup white sugar
1 cup brown sugar, firmly packed
½ teaspoon baking soda
½ teaspoon baking powder
½ teaspoon salt
1 teaspoon cinnamon
2 teaspoons vanilla
2 eggs
1 cup peeled and chopped apple (1 large Gala was enough)
2 cups flaked coconut
½ cup rolled oats
1 ½ cups flour

Preheat oven to 375 degrees. Grease a 9 x 13 pan.

Melt the butter in a large microwave-safe bowl. Add the white and brown sugars. Mix in the baking soda, baking powder, salt, cinnamon, and vanilla.

In a small bowl, beat the two eggs with a fork. Then add them to the rest of the cookie dough. Mix well. Then add the chopped apple and 1 ½ cups of the coconut. (Keep ½ cup for later.)

Add the oats and flour. Mix everything thoroughly.

Spoon the dough into the greased pan. Sprinkle the remaining coconut on top. Bake at 375 degrees for 25 to 30 minutes. The top should brown slightly.

Let cool and then cut into bars.

Saturday, September 18, 2010

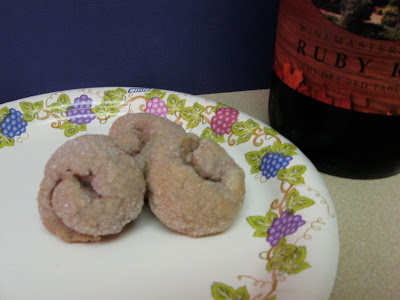
Italian Wine Cookies

I almost didn't post this recipe since I wasn't overly thrilled with the results. My niece and nephews were willing to eat the cookies even though they weren't particularly sweet. The recipe came from allrecipes.com.
Italian Wine Cookies

Ingredients:

3 cups all-purpose flour
1 teaspoon baking powder
3 tablespoons white sugar
1 cup dry red wine (I used a semi-dry red wine.)
½ cup vegetable oil
1/3 cup granulated sugar for decoration

Preheat oven to 350 degrees F. Spray your cookie sheet with cooking spray.

In a large bowl combine the flour, baking powder and sugar. Add the wine and oil. Mix with a large fork and then with your hands.

Roll small pieces of dough between hands to make "logs" then shape into circles. The circles should be no bigger than the 2 inches in diameter. Roll top of cookies in extra sugar and place on cookie sheet.

Bake at 350 degrees F for 25 minutes or until slightly brown. After cookies cool they should be hard and crisp.

Sunday, September 12, 2010

Chocolate Ganache

I needed some frosting for some cupcakes, and I decided to try something new. There are many recipes for chocolate ganache on the internet, so I combined a few ideas and came up with a recipe I think worked really well.

Chocolate Ganache

Ingredients:
2/3 cup semi-sweet chocolate chips
½ cup heavy whipping cream
1 ½ teaspoons dark rum (optional)

Put the chocolate chips into a medium-sized bowl.

In a small saucepan, heat the cream just until it starts to boil. Don’t let it boil away. Then pour the cream over the chocolate chips, and whisk them together until the chips have melted.

If you want, you can stir in the rum after the chips have all melted and you have a nice smooth consistency.

For the cupcakes, I just dipped the tops of them into the ganache. For a cake, you can pour it over the top and let it drip down the sides.

Monday, September 6, 2010

How to Draw Cartoon Characters on Your Cakes

You really don’t need to be a great artist to draw any of your (or your kid’s) favorite cartoon characters on a cake. The only skill you really need is the ability to trace, and we all learned that back in Kindergarten, right? ☺

Character Cakes

What You’ll Need:

• A picture of the character you want on the cake
• Parchment paper
• Piping gel
• Tape
• A cake that you've already iced


1. First, get a picture of your character to trace. Black and white drawings work best. The drawing of Elmo I used for the above cake came from a Google search for an Elmo coloring page. I’ve also traced right out of picture books. One nice advantage of taking your picture from the web is that you can adjust the size to fit your cake.

2. Next, lay a piece of parchment paper over the drawing you want to trace. Tape the parchment paper down so it doesn’t slip on you.

3. Take a small decorating bag (or make one out of some more parchment paper) and fill it with a few tablespoons of piping gel. This is a clear gel that can be found in small tubs in the cake decorating aisle of your craft store. Use the piping gel to trace over the drawing.

4. When you’re done, carefully peel the tape off the parchment paper. Then lift the parchment paper off the drawing. Below is the clear piping gel outline for the Elmo cake.

5. Next, flip the parchment paper over onto your iced cake. Be sure the piping gel side is down. Trace over the wrong side of the outline with your finger as shown below. (Hint: This transfer works best if the icing on your cake has had a chance to dry a bit so that it has a slightly crusty edge. If your icing is too soft, you’ll end up with icing on your parchment paper instead of leaving the piping gel on your cake.)

6. Carefully, peel off the parchment paper. You should now have a clear outline of your character on your cake!

7. Now it’s time to color inside the lines (another skill you learned back in Kindergarten ☺)! Using regular buttercream icing, color your drawing by filling in your outline. I used star tip #16 for his nose (orange icing) and face (red icing). For the whites of his eyes, I used tip #5. Then I filled a bag with black icing. I used tip #3 for the mouth, the pupils, and outlining.

I have a lot of nieces and nephews, so I’ve used this tracing trick on many different characters.

Friday, September 3, 2010

Strawberry Mousse Cake Filling

Here's the filling I used for the Graduation Cap Cake. I wanted a strawberry filling, but I also wanted something light. So I came up with this idea, and it worked even better than I had hoped! (Don't you love it when that happens?)

Strawberry "Mousse" Filling

Ingredients:
1 can of Solo brand Strawberry Cake & Pastry Filling (you can find it in the baking aisle of your grocery store)
1 tub of Cool Whip

Move the Cool Whip from the freezer to the fridge one day before you want to use it.

On the day you make the cake, gently mix the Cool Whip with the strawberry filling. The result is a creamy, fluffy filling that tastes sort of like a mousse without all the fancy prep work.

Unless you are making a very large cake, you will not need all of the Cool Whip and filling. For the Graduation Cap Cake (which had a total of four layers), I used about 2/3 of the Cool Whip tub + 2/3 of the can of filling.

To fill the layers, place your first layer of cake on your cake plate or cake board. Put some buttercream icing in a decorating bag and pipe a nice tube of icing around the edge of your layer. (This will act like a dam to hold your filling in.) Then put your strawberry mousse filling in another decorating bag and fill in the area. If necessary, you can spread the filling with a knife to even it out. Place your next layer on top. If there are more layers, repeat the process.

I had some filling left over, so I stored it in a plastic tub in the fridge. It lasted for a while . . . I can't say exactly how long it would last because I ate it all in just a few days. :-)

Solo makes a ton of different flavors for their cake and pastry filling, so you could mix up all sorts of "mousses" with these. In fact, I'll be making a raspberry mousse for a cake this weekend.

Here's what the Graduation Cap Cake looked like after we cut into it. I'm pretty sure one of the guys at the party polished off all of what you see in this picture.